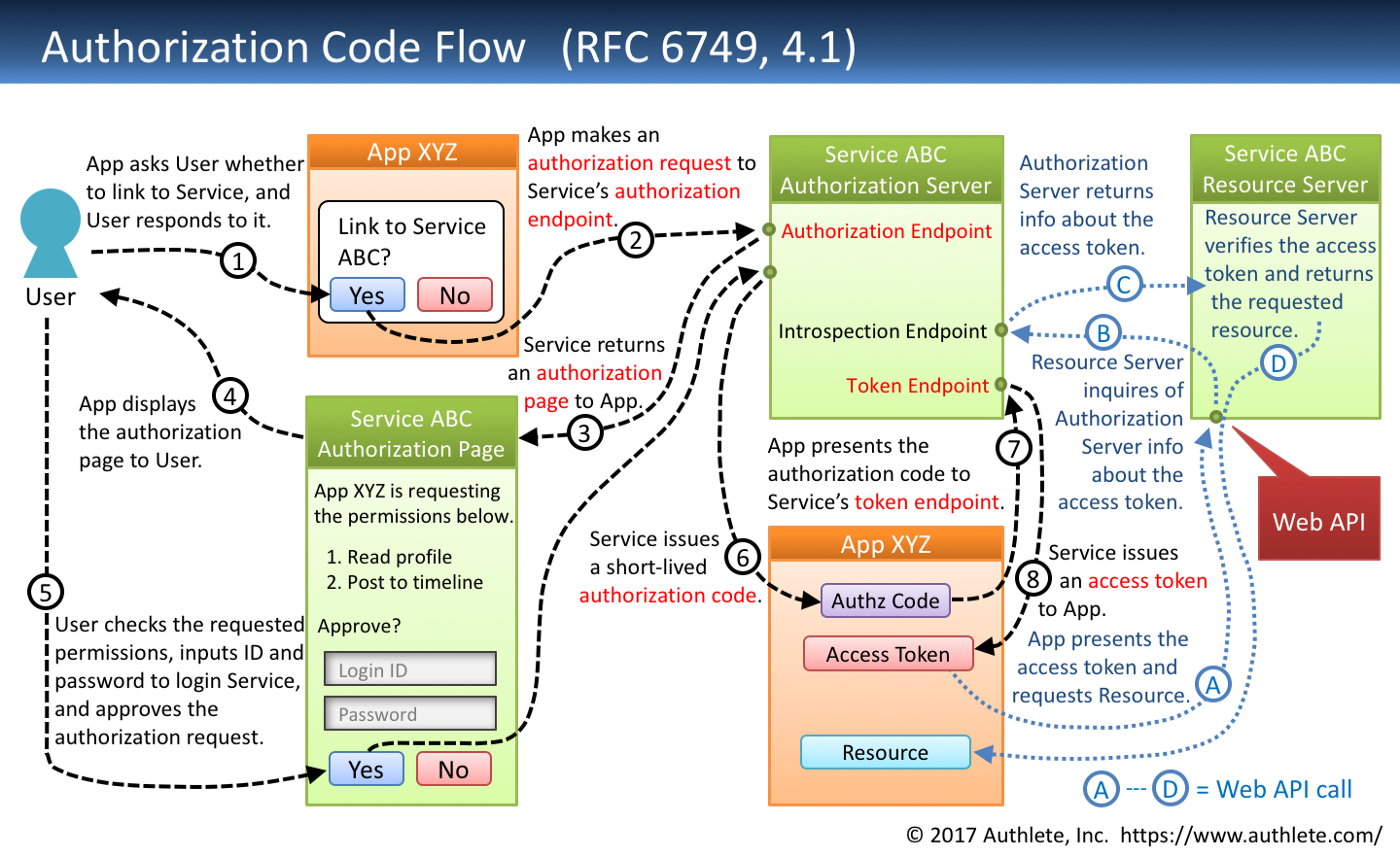
The OAuth2 RFC is extensive and covers numerous use cases. Since your question is pointed towards the most common use case, that is the 'Sign in with' button, we will just talk about that.
Let's get the roles right first:
User: The owner of the resource. For instance, user owns an email [email protected].
Client: The application requesting information owned by the user. This is the application hosting the button 'Sign with XYZ'
Resource: The information that is being requested by the client. The client may want access to your email, your date of birth and your profile picture.
Authorization Server: The server responsible for authorizing client's request to access a user's resource.
Resource Server: The server which holds the user's resource and will transmit it to the user when presented with a valid credential.
The OAuth2 setup:
An application that wishes to access user information or resources hosted on a resource server should first register with the authorization service of the resource. The pieces of information that are necessary for this step are:
- Client FQDN
- Client's callback or Redirect URL
On successfully registering with the authorization service, the client receives a clientId which it will to send to the authorization server during the authentication process.
The Authentication Process:
Let's say user wants to prove to a client (say, client.com), that they are the rightful owner of the email [email protected].
Step 1: User clicks on "Login with example.com" on the client website. Let's call it client.com.
Step 2: This spawns the OAuth2 authentication flow. The resource server's OAuth2 URL will be called with the following paramters:
- clientID
- Redirect URL
- state (randomly generated nonce, not mandatory as per OAuth2 but commonly used)
- type (code is most commonly used, and that is the least you need to know to get started. More on this below.)
- scope
The URL will look something like this:
https://example.com/oauth2?state=018aed36-8f70-4fcb-a49f-0eba5cee22ff&redirectURL=https://client.com/oauth2/callback&scope=email+profile.info&type=code
Step 3: The authorization server performs the following checks on the request before presenting an authentication dialog to the user:
- The referrer header in the request correctly corresponds to the clientID as registered by the client during setup.
- The redirect URL correctly corresponds to the clientID as registered.
- The scope of information requested is acceptable to the authorization server. This may be based on information provided during registration or some other factors.
Step 4: The authorization server presents the user with an authentication dialog. On successful authentication, the authorization server generates a random code. Remeber, the type paramter in step 2 above? The type=code parameter tells the authorization server that the client expects a one-time authorization code for the current OAuth2 authentication request. This is not the final authorization token. Authorization codes are short lived and they provide a layer of additional security to protect the authorization token that will honored by the resource server. The code by itself will not be of any use to the an adversary.
Step 5: The Authorization Server redirects users browser to the redirect URL of client.com that was included in the first OAuth2 call in Step 2 above and attaches the code parameter along with the state parameter with the request (typically in the URL query)
The redirect URL will look something like this:
https://client.com/oauth2/callback?state=018aed36-8f70-4fcb-a49f-0eba5cee22ff&code=3b9d8826-55b5-4e0a-b441-3137c2e9f864
Step 6: When the client.com server receives this request, it makes a call to the Authorization Server and sends the authorization code received from the user's browser. The Authorization Server responds to this request with an Authorization Token which can be used to request information for a user as per the agreed scope.
Step 7: client.com's server makes a call attaching the Authorization Token to the Resource Server for fetching the user's email address. The Resource Server in turn sends a request to the Authorization Server again to verify whether the token is correct and the requested resource is within the scope of the authorization. Once authorized by the authorization server, the resource server sends the requested resource, in our case, the user's email address ([email protected]) to client.com's server. Once, the client.com server receives this information from the resource server, it can happily conclude that the user is the rightful owner of the said email address. The server sends a cookie or any other token it uses for maintaining the client session and allows the user to use client.com's application.
Steps 6 & 7 are hidden from the user. The communication takes place directly between the client's server and the resource server. So, it can be confusing at first to imagine what is happening on the backend while you are waiting for a response from the client.
You can take a look at the below image, to get a descriptive flow of the process:

Image Attribution: https://medium.com/@darutk/diagrams-and-movies-of-all-the-oauth-2-0-flows-194f3c3ade85
Would also help to read this blog post for even better clarity.

